10 minute CICD setup in Google Cloud
Setting up a simple and cheap pipeline using google cloud
Setup
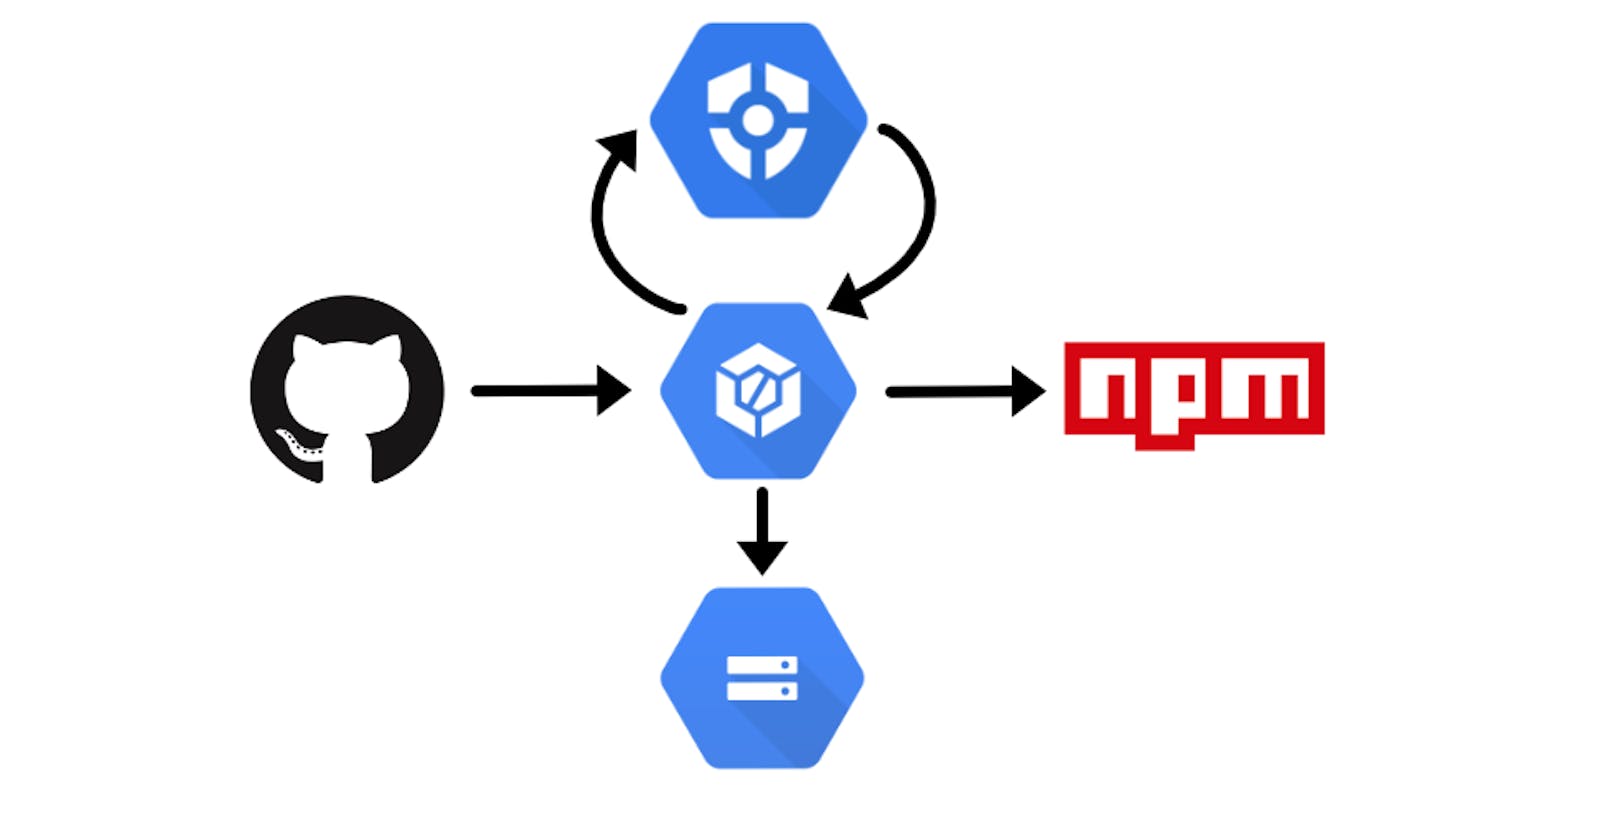
CloudBuild is great. They're currently offering 120 minutes free each day of build time + their built in images allow us to quickly setup a pipeline to meet our CI/CD needs.
In this particular article we are setting up a Node project to be published to NPM. The steps here can be generalized to suit other languages and deployment targets as well. Please refer to the reference section to see what options are available for you to cater these steps to your project.
Prerequisites
We are assuming the following has been set up properly on your google cloud account.
- Cloud Build
- Will be responsible for receiving GitHub events and triggering the pipeline steps we define.
- Secrets Manager
- Used to store the access token that we will need in order to publish to NPM. Be sure to set up permissions for your
YourProjID@cloudbuild.gserviceaccount.comto be a "Secret Manager Secret Accessor" for any of the keys or tokens you store in order for cloud build to be able to access them.
- Used to store the access token that we will need in order to publish to NPM. Be sure to set up permissions for your
- Google Storage
- Used to store our build artifacts as well as our CI results.
- Billing
- Needed to enable us to use the above tools. Ensure the Billing is linked to the particular project you are setting your pipeline up for.
Roadmap
We will separate our pipeline into two pieces.
# 1 (Integration): Will be responsible for ensuring code quality before we merge any new code. This step will be triggered anytime we put up a new GitHub PR and will return a Pass/Fail (visible from our GitHub PR) to let us know the results of the checks we put in place.

# 2 (Deployment): Will be responsible for taking our code and publishing it to NPM for us. This step will be triggered anytime we merge into master.

Instructions
1. CI
 a) Go to CloudBuild on your Google Cloud console and Select [Connect Repository] (you might be presented with a different splash screen if its your first time accessing CloudBuild). Follow the dialogue to allow CloudBuild to connect to your GitHub account and grant it access to your desired repos.
b) Select [Create Trigger]
c) Name and describe your trigger as you see appropriate. I boringly named mines "pull-request"
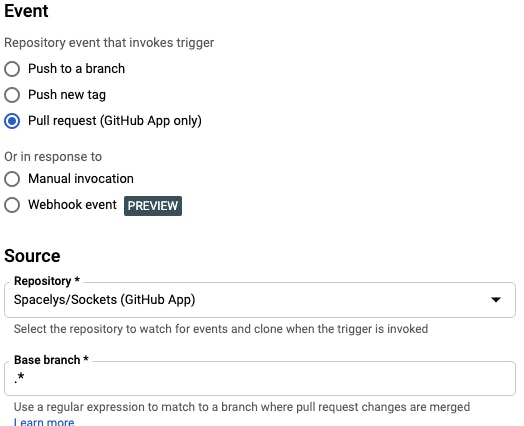 Set "Pull Request" as Event and select your Source Repository. If you don't see your repo, then Step (a) wasn't done correctly. Set the base branch as .* to ensure this trigger runs for any PR we push up.
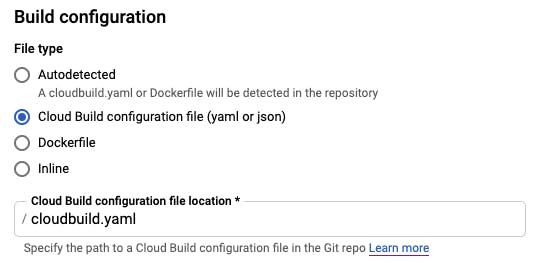 Scroll down to build configuration and set it to "Cloud Build configuration file". It defaults value is
 /cloudbuild.yaml which is what we will be using.
Click [Create] so we could start using our trigger.
d) Now that we have a trigger listening for pushes to PRs, we should setup our cloudbuild.yaml. Create a cloudbuild.yaml file on the root of your repo. This will contain the instructions to ensure code quality.
/cloudbuild.yaml
steps:
# Install
- name: 'gcr.io/cloud-builders/npm'
  args: ['install']
# Unit Test
- name: 'gcr.io/cloud-builders/npm'
  args: ['run', 'test']
# coverage
- name: 'gcr.io/cloud-builders/npm'
  args: ['run', 'coverage']
# Lint Check
- name: 'gcr.io/cloud-builders/npm'
  args: ['run', 'lint']
artifacts:
  objects:
    location: 'gs://spacelys/sockets/outputs/$SHORT_SHA/'
    paths: ['coverage/**.*', 'package.json']
Since we are using node, we are leveraging the npm cloud-builders provided to us by CloudBuild. Our steps here run npm install npm run test npm run coverage npm run lint. All of these commands are defined in our package.json. Since these are specific to your project, implement them as you see fit.
After it successfully runs the steps defined in our cloudbuild.yaml file, CloudBuild will export the file(s) defined in artifacts. These build artifacts are pushed to the cloud storage bucket defined in location and using some of the built in variables we can ensure each commit gets its own folder.
This is done by using $SHORT_SHA which represents the short version the commit hash which triggered the current build.
2. CD
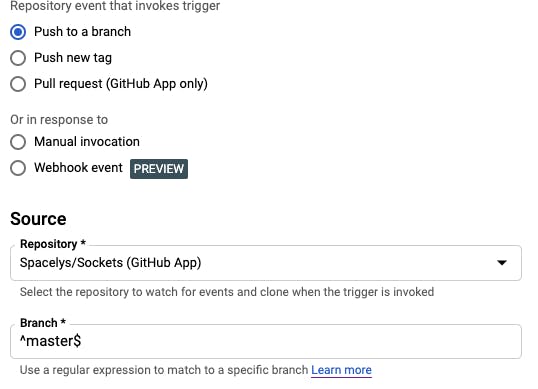 a) Create a new trigger. For Event select "Push to a branch", and ensure the Branch defined in the source is set to
 ^master$. This ensures our trigger only runs when we push to master.
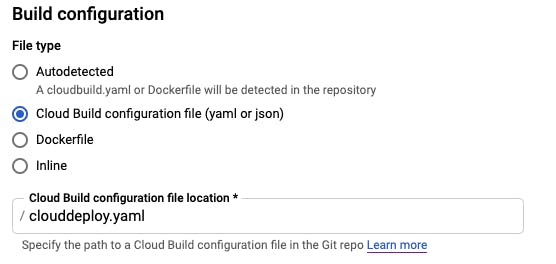
b) In Build configuration, we are selecting "Cloud Build configuration file" but this time we are going to specify /clouddeploy.yaml instead of the default.
/clouddeploy.yaml
steps:
# Install
- name: 'gcr.io/cloud-builders/npm'
  args: ['install']
# Build Step
- name: 'gcr.io/cloud-builders/npm'
  args: ['run', 'build']
# Prepare file needed for automated Publishing
- name: gcr.io/cloud-builders/gcloud
  entrypoint: /bin/bash
  args: ['-c', 'echo "//registry.npmjs.org/:_authToken=$${NPM_TOKEN}" > .npmrc']
  secretEnv: ['NPM_TOKEN']
# Publish Step
- name: 'gcr.io/cloud-builders/npm'
  args: ['publish']
# Store Step
- name: 'gcr.io/google.com/cloudsdktool/cloud-sdk'
  args: ['gsutil', 'cp', '-r', 'dist', 'gs://spacelys/sockets/outputs/$SHORT_SHA/dist']
availableSecrets:
  secretManager:
  - versionName: projects/1088776892318/secrets/spacelys-publish-npm/versions/latest
    env: 'NPM_TOKEN'
Our steps here include our npm install npm build npm publish. Then with the cloud-sdk image we we push our build to the dist folder in our commits google storage directory.
Publishing to NPM + Handling secrets
I want to bring special attention to how we are automating our npm publish. In availableSecrets section we defined on our clouddeploy.yaml we see that we are using Secret Manager and giving it the location of our secret.
The accompanying env property tells our build to store that secrets value as an environment variable called "NPM_TOKEN". Looking up at our name: gcr.io/cloud-builders/gcloud step we are defining that there is an environment variable we are using that comes from our secrets with secretEnv. Even tho the property is called secretEnv, the cloud-builder image treats it as a regular environment variable when running.
Then we just do a simple bash script
echo "//registry.npmjs.org/:_authToken=$${NPM_TOKEN}" > .npmrc
to write the .npmrc file that npm expects to be present in your projects directory when doing automated publishing.
Tradeoffs & Improvements
The pipeline we defined is pretty simple. Some decisions we made were in order to keep it simple even tho there are better ways to approach things. In this section I'd like to go over some of the decisions we took + how we could improve it.
- Manual Versioning - We are responsible for updating our package.json with the version we intend to deploy. In a more complete pipeline we could trigger releases which would make commits back into our branch with our updated version as well as trigger the deployment.
- Master Always Publishes - Similar to what we mentioned above, our release is triggered by a merge to master. This allows us to keep things pretty simple but it would be better if we could merge to master without always having to publish.
- Reduce Installs - We are actually installing our NPM project twice. Both in the integration and deployment steps. We should just be building in our integration step, storing the build, and deploying our that stored build. This would reduce the need to install + build on deployment and focus strictly on the deployment aspect of it.
While I think the aforementioned improvements would be great to implement if you wanted to improve the current pipeline, I wanted to keep my steps nice and simple. The pipeline defined in this document suits the needs for my particular project well enough and hopefully yours to the point where the trade-offs for simplicity are worth it.
